
Today we’re going to create a React list component, that renders a list of Contact components. You’ll learn how to create functional stateless components and how to pass props from a parent component.
In the previous part of this series you learned how to create a React app with create-react-app. In this post, we are going to create a React List Component to display a list of contacts.
Over the whole series of articles, we’re going to build a functional contact list with React:
Part 1 – How to Create a React App with create-react-app
Part 2 – How to Create a React List Component
Part 3 – How to Connect your React App to a REST API
Preparations
If you don’t have the source code of the previous part ready, you can clone it from GitHub and install the dependencies:
git clone https://github.com/areiterer/contacts-manager.git
cd contacts-manager
git checkout part-1
npm install
Now start the application:
npm start
If you visit http://localhost:3000 in your browser, you should see the default React app that we create last time.
Now that you’ve got everything prepared, you’re ready to get your hands dirty. Let’s talk about the concept next.
The Concept
Before we start, here’s what we are going to build today
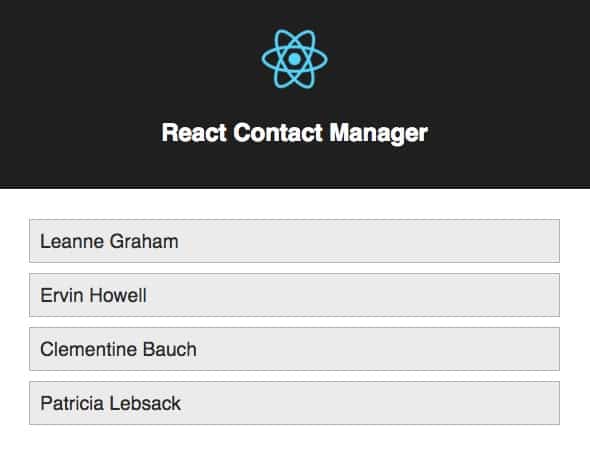
What you can see above consists of two components:
- A Contact component to show a contact’s name, represented by the grey rectangles in the above screenshot
- The ContactList component to render a list of Contact components.
We will pass an array of contact objects to the list component. It then renders one Contact component for each of the objects:
[
 { "id": 1, "name": "Leanne Graham" },
 { "id": 2, "name": "Ervin Howell" },
 { "id": 3, "name": "Clementine Bauch" },
 { "id": 4, "name": "Patricia Lebsack" }
]
In the next sections we will first build the Contact component and then create React list component to render a list of contacts based on our data array.
Creating the Contact Component
For our our Contact component, add a new file
src/components/Contact.js
Next, add the basic structure of a simple functional component:
import React from "react";

function Contact(props) {
  return <div>This is a contact</div>;
}

export default Contact;
What you see here is a stateless functional component. We are not using a ES6 class based component, because we don’t need state or lifecycle methods in this case. (Read more about class based vs. functional components)
While working, we want to see our changes instantly, so we need to add our newly created component to the App.js — it should look like this:
import React from "react";
import logo from "./logo.svg";
import "./App.css";

import Contact from "./components/Contact";

class App extends Component {
  render() {
    return (
      <div className="App">
        <header className="App-header">
          <img src={logo} className="App-logo" alt="logo" />
          <h1 className="App-title">Welcome to our Contact Manager</h1>
        </header>

        <Contact />
      </div>
    );
  }
}

export default App;
As soon as you save your changes, the app inside the browser window reloads and displays our changes.

Now that we can see changes instantly after you save them, we can start right away with our component:
function Contact(props) {
  return (
    <div>
      <span>Leanne Graham</span>
    </div>
  );
}
Yep, that’s it.
Our Contact component is literally just a div with a name in it. It’s just static for now, so the list would only show Leanne Grahams but that’s good for now.
Well, actually it doesn’t look nice yet, so let’s add some styling.
Basic Styling of a Component
Create a new file for our styles:
src/components/Contact.css
To be able to use this stylesheet, you need to import it at the top of Contact.js and add some classes for styling to our component’s markup:
import React, { Component } from "react";
import "./Contact.css";

function Contact(props) {
 return (
 <div className="contact">
   <span>Leanne Graham</span>
 </div>
 );
}

export default Contact;
Then, add the classes into the stylesheet that you’ve jut created:
.contact {
  margin: 10px;
  padding: 10px;
  border: 1px solid #bbb;
  background-color: #eee;
}

.contact span {
  font-size: 1.2em;
  text-decoration: none;
  color: #333;
}
We won’t win a design contest, but it’s a lot better than before 🙂
Now it’s time display actual contact names with our Contact component. We manage to do this, by passing data with props.
Pass Data to Components with Props
Components accept arbitrary inputs called props. This means, whatever you pass to a component, is accessible inside by referencing the respective name inside the props object.
Props are used to pass data from one component to another one. In our example, we want to pass data (a contact’s name) to the Contact component. Since we don’t have our list component ready yet, we are going to pass a name to our component within the App.js
// App.js
// ...
<Contact name="Leanne Graham" />

// ...
Now that we passed the name of the contact, we have to make use of the passed data from inside the component. We do this by rendering the passed name by accessing the passed name with props.name:
function Contact(props) {
  return (
    <div className="contact">
      <span>{props.name}</span>
    </div>
  );
}
To access certain props you passed to the component, you can reference them as a property of the props object. Like we just did with props.name. Just be sure to use the same name in the markup of the parent component.
Now our component displays whatever name we pass to it from an outside component. We will need that later, when we build the ContactList component.
Before doing so, let’s make our component a little bit more secure and validate our prop, so we can be sure that it’s always a string and it’s always provided.
To validate our props, we use prop-types.
Validating Props with prop-types
We use an npm package called prop-types to define the props of a component—and their data type. After installing the package with
npm i -S prop-types
we define the props of our Contact component:
import PropTypes from "prop-types";

function Contact(props) {
  return (
    <div className="contact">
      <span>{props.name}</span>
    </div>
  );
}

Contact.propTypes = {
  name: PropTypes.string.isRequired
};
So what did we just do?
We defined, that the name prop is of type string and that it’s mandatory.
If you pass something that is not a string, or do not provide anything for this prop, you will get an error in your browser’s console.
If you want to know more about validating props with prop-types, have a look at one of my recent articles:
http://www.andreasreiterer.at/web-development/react-proptypes/
Now we have a small component that displays a contact’s name. Also, we’re using prop-types to validate our props to avoid nasty bugs later on. As our next step we’re going to create the ContactList component.
Creating a React List Component
Let’s begin with our ContactList component by creating a new file:
./src/components/ContactList.js
You know what’s next: Create a functional component inside. Again we don’t need state or life cycle methods, so we use the functional approach.
import React from "react";

function ContactList(props) {
  return (
    <div></div>
  );
}

export default ContactList;
Next, we have to perform two steps to finish our list:
First of all, we know that we’re going to display our Contact component, so we import it at the top of the file.
Also, we know that we somehow need to get our array of contacts (see the array on the top of this article) into the component. In the last section, you learned about props. We use them to pass the contacts, so the component can stay simple and small, and the whole data gathering and preparation is happening somewhere else, which is – in our case – a static array of contacts in our App.js, but more on that later.
Rendering a List with map()
To render a Contact component for each of the contact items, we use an ES6 array function called map. If you don’t know it yet, have a look at the docs of Array.map(), you will use this a lot with React and lists.
Basically, Array.map() is an arrow function that iterates over an array and performs an action for each of the items. In this case it returns a Contact component for each item in the array.
Let’s have a look at the code:
import React from "react";

// import the Contact component
import Contact from "./Contact";


function ContactList(props) {
  return (
    <div>
      {props.contacts.map(c => <Contact key={c.id} name={c.name} />)}
     </div>
  );
}

export default ContactList;
Using Expressions Inside JSX Markup
First, we imported the Contact component. Then we added an expression inside curly braces to our component’s markup to render the contacts.
To use a JavaScript expression inside JSX markup, you have to wrap it with curly braces.
Let’s have a closer look at that expression:
props.contacts.map(c =>
   <Contact key={c.id} name={c.name} />
 )
To use JavaScript inside our markup, it has to be wrapped with curly braces. This is necessary to build collections of elements, like we do here. The same is true for passing props. So if you want to pass an object to a component via props, you’ll have to use curly braces instead of double quotes, otherwise you’ll end up passing just a string.
We expect an array of contacts to be passed to ContactList by a prop called “contacts”. So in our expression we use map to iterate over all of the passed components.
In the callback of the map function, we return a Contact component for each item. The “name” prop of the Contact component is set by referring to c.name while c is the current item (contact) of the iteration over all contacts.
A “key” is a special string attribute you need to include when creating lists of elements.—React Documentation
In addition to the “name” prop, we’re also setting another prop “key”. According to the React documentation, “key” is a string attribute you need to include when creating lists of elements. React needs those keys to identify which items of a list have changed, are added or removed. Each of the items need an unique identifier. In most cases the id of an object suits well for that.
Display our changes
Now that we are almost finished, let’s have a look at our newly created component. To do so, let’s replace the Contact component inside App.js with a ContactList. But don’t forget to pass our sample contacts 🙂
import React, { Component } from "react";
import logo from "./logo.svg";
import "./App.css";

import ContactList from "./components/ContactList";

const contacts = [
  { id: 1, name: "Leanne Graham" },
  { id: 2, name: "Ervin Howell" },
  { id: 3, name: "Clementine Bauch" },
  { id: 4, name: "Patricia Lebsack" }
];

class App extends Component {
  render() {
    return (
      <div className="App">
        <header className="App-header">
          <img src={logo} className="App-logo" alt="logo" />
          <h1 className="App-title">React Contact Manager</h1>
        </header>

        <ContactList contacts={contacts} />
      </div>
    );
  }
}

export default App;
If you now have a look at the application in your browser, you’ll see all of our contacts rendered nicely.

Wrapping up
Today you learned how to create a component with props, and how to create a React list component. You read how you can iterate through an array of objects with the Array.map function to return a list of components, and you also learned how to validate props to avoid errors caused by wrong passed data.
The code of this example is available on GitHub. To use it, clone the repository and checkout the branch for part-2
git clone https://github.com/areiterer/contacts-manager.git
cd contacts-manager
git checkout part-2
In the next parts of this series we’re going to learn how to connect our React list component to a REST API, so we can fetch the data to display from a remote service instead of mocking it statically.
Did you like this post? Share it with your friends or leave a comment!
Continue with Part 3
In the third part of this series we’re going to read data from a REST API and display it in our app. Have a nice read!
http://www.andreasreiterer.at/web-development/connect-react-app-rest-api/
Thanks for reading the article about creating a React list component! I would like to know what you think. Leave a comment, contact me on Twitter or send an email to hi@andreasreiterer.at – I’m happy to respond to any message I get.
Hello!
You would use this type of list everytime you have to render a list of items.
e.g. Menu items, a list of tags etc.
But be careful – it may be bad for the performance of your app, if you are rendering lots of items this way.
For really long lists, there are other solutions, like react-virtualized or any kind of infinite scrolling library.
I hope I could help a bit 🙂 Let me know if you have more questions!
At the moment I am doing a website on cruise ships using React.
I have got so far with it, but now I am stumped on how I can show List of Ships based on the specific Cruise Lines.
Note: that this is on the Cruise Lines Page.
Here is a link to my repository (https://github.com/RobertWSON/Personal-ship-project/tree/practice-animation-react-slick) and the up to date code is on practice-animation-react-slick branch
I have used map function in listofShips.jsx component
This website example http://www.cruiseshipodyssey.com/worlds-fleet/ I found doesn’t use react, but shows ships based on specific cruise.
I also think that it would be nice if I could have list of ships under the specific cruise line displayed in a listbox. Having each cruiseline in a format of rows and columns would be good. I have looked on the internet to find out how to do this, but haven’t found anything yet do you know of some good resources? Having the listbox expand and collapse I would like to have as well and I have heard that you can use Accordian to do this.
The code below is what I have in my ListofShips component, but this is only good for displaying all cruise ships, which I don’t want.
import React from ‘react’
import {Link} from ‘react-router-dom’
import {getAllShips} from ‘../api/api’
class ListofShips extends React.Component {
constructor(props){
super(props)
this.state = {shipList: []
}
this.setUpShips = this.setUpShips.bind(this)
}
componentDidMount(){
console.log('cdm')
this.setUpShips()
}
setUpShips() {
console.log('getallships')
getAllShips()
.then(res =>{
this.setState({
shipList: res
})
})
}
buildShipName(ship) {
return ship.cruise_line ? (ship.cruise_line + ': ' + ship.ship_name) : ship.ship_name
}
render() {
return (
<React.Fragment>{this.state.shipList.map(ship => {
return <li className="shipsList" key={ship.cruise_line + '-' + ship.ship_name}><Link to={`/ship/${ship.id}`} >{this.buildShipName(ship)}</Link></li>
})}
   </React.Fragment>

  // </div>

)
}
}
export default ListofShips
Hi Andreas, love your tutorial thank you. I’ve finished it and I wanted to modify it by giving each of those names a “Contactlocation” element on the right so in App.js I modified the array to look like this…
================
const contacts = [
{ id: 1, name: “Leanne Graham”, location: ” 22 Brooklyn Ct, New York, USA”},
{ id: 2, name: “Ervin Howell”, location: ” 44 Paradise Rd, Woodridge QLD, AUS”},
{ id: 3, name: “Clementine Bauch”, location: ” 17 McCrae St, Dandenong VIC, AUS”},
{ id: 4, name: “Patricia Lebsack”, location: ” 2 Market St, Bury Manchester, UK”}
];
And I made a copy of Contacts.js, called ContactLocation, and copied and pasted the code changed the props to what was in the array, “location” and did this in the div in ContactList.js
====================
{props.contacts.map(c => )}
So it works. It’s just not aligned to the left like I was hoping. If you have ideas there, I would like to know. Thanks.
Hi Jordan!
Thanks for the great feedback 🙂
Can you show me how you added the location to the div?
Probably it’s just a styling issue
Hi, I haven’t really found away a yet to use ContactLocation.js with compile errors and didn’t make any new styles yet. Anyway here is the code from ContactList with the div. The location word is at the very end of the second prop. ====================
import React from “react”;
// import the Contact component
import Contact from “./Contacts”;
function ContactList(props) {
return (
{/*.map passes iterates over our list and returns
a component object for each item in array*/}
{props.contacts.map(c => )}
{props.contacts.map(c => )}//LOCATION HERE
);
}
export default ContactList;
Develop Contacts component using purely Functional Components and React Hooks (useState, useEffect) like mentioned in wireframe. You must use API url to develop https://reqres.in/api/users?page=1. It comprises 2 child components ContactList.js, ContactDetail.js inside Contacts.js. When click on one contact, ContactDetail displays selected component.